Tuesday 30 November 2010

Facial controls and fingers

I have set some driver keys and made some basic controls for Cornelius' face.  I did this by making a NURBS square and the some nurbs circles to act as controllers.  In the Set Driven Key window, I selected each NURBS circle and set it as a driver for a different blend shape and then I moved the NURBS circle and then keyed the blend shape poses; meaning that I could use the NURBS as controllers to change the facial expressions, rather than using the Blend Shape window.

Here is an example of how it works.  I suggest you watch in full screen!
As for the fingers, I was going to put in drivers, but I decided that for the project, it would be just as efficient to rotate and translate the joints, as I am not required to animate this character for the project.

I finished up by locking the translate, rotate and scale of my facial controller box.  As for the NURBS circles, I limited the movement, so that they could only translate on the Y axis (X axis in the case of the smile controller) and only within the controller box.

Rigging

This post is a little late but I've been busy with other stuff lately.  Here, I shall talk about the rigging of Cornelius.
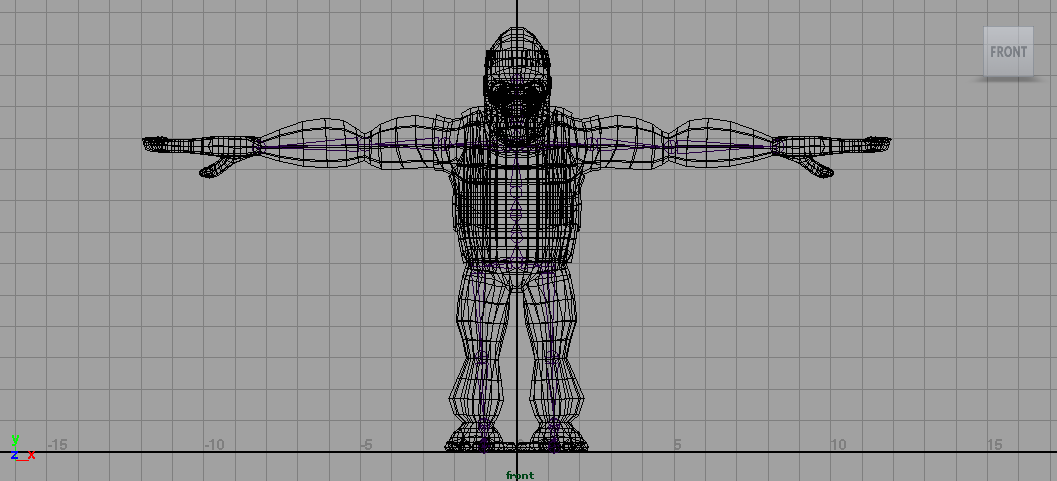
I have done several character riggings over the course of my degree and I find that I have become very proficient at it.  I managed to rig Cornelius largely without any tutorials to guide me, and I applied a Smooth bind to his skin.  I had previously been used to working only with Rigid binds but I discovered that with Smooth binds, I could have more control over the influence that each joint had, avoiding any further problems.

I also put some joints in his hands and fingers, as these will be important for 2 of the poses that I am considering.
During the rigging process, I discovered a problem with Cornelius' feet, in particular his inner toes, they were joined together by the vertices!
This meant that I had to delete the some of the faces in both of the offending toes and then create polgon faces and extruding them to make new toes from scratch.  I had to make sure these toes were not close to one another.
The new toes looked far cruder than the previous but they caused less problems.  I simply went around the joints in each leg with the Paint Weights tool to control the influence that each joint has on the geometry.

I did the same in the gorilla's arms and hands.
I also discovered that when I turned Cornelius' head, the top half would move further than the bottom half, creating a distorted effect, meaning I had to increase the influence of the head and neck joints, and decrease the influence from the chest.
I then went through the back joints and increased or decreased the influence to make sure his bending down is smooth.

The next stage is to set some driver keys for his face and possibly his hands.

Sunday 28 November 2010

Blend shapes

I've just done the blend shapes for Cornelius's face;  I did this by creating various blend shapes in the Blend shapes window and adding the head as a base.
As I won't actually be animating this character, for the sake of this unit and time management, I stuck to a small set of facial expressions that I would be using for Cornelius.  I also made blend shapes for his eyelids, so he could open and shut his eyes.

Here is Cornelius with all the facial expressions that he is capable of.

In order to control Cornelius' facial expressions, I just need to control the blend shapes either with the slider in the Blend Shape window, or by creating driver keys.  Cornelius is starting to resemble the Hindu god, Brahma a bit too much, so I shall simply add all of the blend shapes to a layer which I will lock and make invisible, of course keeping the original head visible and in its own layer.

Next, I need to do Cornelius' rigging!

Saturday 27 November 2010

Finishing modelling

I have just finished the last stages of the modelling, and slightly behind schedule; although if I get blend shaping and rigging done this weekend, I'll be back on top.

I modelled one half of his glasses, with a hollow polygon cylinder and then extruded arms and a bridge from the cylinder.  The lens is simply a NURBS curve.
I then Mirrored the geometry of the gorilla's head, and then I modelled his headband, again with a hollow polygon cylinder.  I then moved the vertices so the headband fit around his head more.

Lastly I modelled his eyeballs, Polygon spheres.
Here is how Cornelius looks at present, fully modelled.


Thursday 25 November 2010

Mirroring Cornelius' body geometry

I've just mirrored Cornelius' body geometry, including his waistcoat and t-shirt, but not his head yet.  It looks pretty good so far!  Click to enlarge.
I did have to make a few amendments to his geometry, once it had been mirrored, primarily in his crotch region, which I had to delete a few edges from to make more smooth.  I also had to delete a few edges and merge a few vertices on his waistcoat, as well as move a few vertices that went into his skin geometry.

Next step is to finish modelling his glasses, along with mirroring his head geometry and I will be able to move onto the next step; blend shapes!

Ear modelling

I have modelled the gorilla's ear as, which I also did with the aid of a tutorial.  I used this tutorial on how to model a human ear: http://www.youtube.com/watch?v=QcYrUHRIqsE.  I also used a photo of a gorilla's ear that I found on the internet as reference.
A gorilla's ear is a slightly different shape to a human's ear in that the ear lobe is closer to the helix (the rim around the top of the ear), but the principle of making it from a hollow Polygon Cylinder and then extruding the inner parts was the same.
When I fully modelled the ear, I attached it to Cornelius' head, by the vertices.

Facial modelling

Here is the first of several posts that I will be posting today.  Here, I will recap on the facial modelling that I largely finished yesterday.  I modelled the face using this tutorial (http://www.youtube.com/watch?v=xls25e08sSg) as an aid, but i didn't stick to it stage by stage.

One of the errors that I came across in my character template was that the face in the front and profile was not lined up properly.
The eyes, nose and mouth in the profile image were slightly higher up than in the front image.  This meant that I had to decide on the relevant areas to have each part of the face without the adequate reference.  I was still able to use the profile reference to decide how much Cornelius' mouth should come out and the angles at which his eyes were visible from.
To produce his nose and mouth area, I was originally going to create separate polygons, but I decided that it would be easier to model them from the face that I had just produced.  I created the nose by cutting some edges around the nose area and then rotating the it out to make the round, flat shape.  I created the nostril by exturding a face and scaling inwards.
The mouth was created by pushing the edges around the area inwards, making a more distinctive shape.  and then extruding the faces outwards against the profile reference.

This is how the head looks at present.
Now all that is left is to model the ear, half of his glasses and then mirror the geometry.

Wednesday 24 November 2010

Hands and feet

Following the tutorial that I posted up in the last blog post, I have finally managed to model the hands.  It only took me about an hour, but I didn't get round to it until today because of stuff involving the other unit.

It turned out to be fairly easy to model the hands, simply involved making extrusions in a polygon cube with 4 subdivisions and with the 'Keep Polygon Faces Together' option turned off.

The tutorial also showed me how to make fingernails, which I managed to do by cutting and extruding faces in the fingers.

I was so pleased with myself that I also decided to put some nails in the gorilla's toes as well, using the same method.
The next step is to model Cornelius' head and face; this is the part which I am most anxious about because I have already made several unsuccessful attempts at modelling a face.  I hope that I can get this done by tomorrow, because if I don't, I will officially be behind schedule.

Thursday 18 November 2010

Modelling the hands

Now, I need to work on modelling the hands of the gorilla.  I haven't done much hand modelling in Maya, so I may need some reference on how to model the gorilla's hand accurately.  I've just got this image off the internet to use as reference.
I've also come across this tutorial http://plissken.fatalunity.com/tutorials/subdiv/step1.html, so hopefully I should be able to model it without too many problems.

Pelvis finally modelled

I've finally modelled Cornelius' pelvis after quite a lot of trial and error.  I found that I had made some mistakes such as splitting the Polygon tool so the vertices were not evenly lined up with those of the torso and the leg.

I've just tried modelling it again and after needing to move a few vertices, I think I've sorted it out

Tuesday 16 November 2010

Modelling has commenced

I have now begun modelling, this is how Cornelius looks at present:
I seem to be having some surprising difficulty modelling his pelvis.  Once this is done, I can focus on his hands, feet and head.  It was also very tricky trying to model the gorilla's neck as is is quite small and a gorilla's head is often in front of it's shoulders.

Sunday 14 November 2010

Character template for Cornelius

Here is the template that I have made for Cornelius, to show his profile and front views.  When I move on to modelling, I will import the front and profile images into Maya and use them as the basis for modelling Cornelius.
As ever, click on the image to enlarge

Thursday 11 November 2010

Introducing Cornelius

I've just spent the best part of 3 hours producing my first fully coloured, fully textured illustration of Cornelius.  I drew it and coloured it in using my graphics tablet in Photoshop.  In this picture, I tried to decide which colours and textures worked best for each part of Cornelius, including his fur, shades and clothing.  I ultimately left out the beaded necklace, because I found it quite tricky to draw well and it didn't really seem to suit him.
Click on the image to view in large
Please let me know what you think of the colours and textures in Cornelius and his clothing; and if there is anything that I could improve.

Cornelius character designs

I've done quite a few character design concepts for Cornelius; I've tried to design him so it is clear that he is a veteran of the hippie movement, but so the original character of a sensible, down-to-earth gorilla is also recognisable.

One of the first ideas that I went with was the stringed waistcoat, with headband and necklace displaying peace symbol.

I also looked into hippie jewellery and found out about hemp necklaces; and a lot of them had beads, so I tried Cornelius out with one of them.  I also drew him in various poses that I came across in the gorilla research photos.  This pose would be good for portraying Cornelius observing the human life that enters London Zoo.

I also quite like the guy's outfit in the Hair- Aquarius video at 0:03 seconds, you can see this video in the More Hippie Photos post.  I tried this on Cornelius; this waistcoat will probably be easier to model than the stringy waistcoat.

These are a few facial studies for Cornelius; up to this point, I had only drawn realistic looking gorillas and the brief requires the character to be inspired by the claymation.  I played around with the shape of his nose and also giving him drooping eyelids, similar to Dylan from The Magic Roundabout.

I decided that I wanted to use the background peace image from the 'Old Hippie' video, that is also viewable from the More Hippie Photos post.  I have combined the waistcoat with a t-shirt which has this image.  I have also started playing with the patterns on Cornelius' headband

Once I had finalised Cornelius' design, I drew him in the Lotus pose.  I think he will have a t-shirt with the peace symbol, a waistcoat with the rainbow sign, a hemp necklace, a headband and John Lennon glasses.  I will probably use the Lotus pose as one of his three poses.

Here is a close up shot of the same character design.
The next stage is to get these on computer and coloured in, ready for modelling.

Wednesday 10 November 2010

Video footage from London Zoo

Yesterday, I went to London Zoo to do some research for this project and also the other project that I am doing on environments. For this project, I did some filming of the gorillas in the zoo to figure out how they normally behave in an artificial environment, such as a zoo, where they are consistently stared at by people. Seen as Cornelius is a character that is used to promote London Zoo, it would make sense to see how the gorillas from within this zoo behave.

Unfortunately, the weather was pretty bad and this meant that there weren't many gorillas around and they weren't up to much. I did manage to get some video footage of one gorilla.


Sunday 7 November 2010

Animation to reference

Just been looking for various animations to help shape Cornelius; the brief states that the character will need to reflect traditional Claymation technique, even though it will be computer generated. As I'm looking to make my Cornelius into a hippie, I've decided to look at clay animation from the 60s and 70s.

One of the animations I looked at was The Magic Roundabout, largely because I remember the rabbit character, Dylan resembled a hippie.


The animals in The Magic Roundabout are very stylised and are made up of very basic shapes, particularly Ermintrude. So far, I have been trying to draw quite a realistic gorilla and then put him in hippie clothing.

I could base the Cornelius' style more around that of Dylan, as he is a hippie "claymation" character, but he was also turned into CGI, along with the rest of the characters in the 2005 film version of The Magic Roundabout.

More hippie photos

Some more photos of hippies to use as reference for designing Cornelius. It's actually surprisingly difficult to get hold of some decent hippie images.


And here's some video references as well...


This guy is worth a listen :D


An old hippie I came across on Youtube, I'd quite like to use the background image in Cornelius' clothing somehow.

Thursday 4 November 2010

Gorilla sketches + ideas for Cornelius character

As promised, here are a few sketches of gorillas that I did based on the photos in the previous post.
Click on an image to view in large


As well as studying the anatomy and facial characteristics of gorillas, I have been considering various types of character that Cornelius could be, which would be completely original and unlike anything anyone else in our group is doing.

Cornelius is described in the brief as "middle-aged" and also as "civilised and sensible"; this character's key quality is that he is an observer and he has an enlightened view of the humans that come into the zoo each day.

One of the ideas that I had pondered for this character fairly early on was to portray him as an old hippie character, as I imagine him to be quite easy going, but also very philosophical. He is also fairly old, so he has probably been through the hippie movement and has carried that ideology with him into the present day.

I have looked around the internet for images of hippies to reference. Click on an image to view in large

I have also some images religious figures and symbolism, because the hippie movement tapped into many religious beliefs including Christianity, Buddhism, Hinduism, Wicca and many others. These could be used to shape the look of Cornelius.
Click on an image to view in large

And finally, here are some early character designs I have done of Cornelius, I am still working on various designs for this character.
Click on an image to view in large
Cornelius is described in the brief a down-to-earth character and the most sensible occupant of the zoo. Therefore, I must make sure that I do not make him too eccentric, as these key qualities will be lost. An old hippie character seems like it could be quite easy to portray as eccentric, so I need to try and find some kind of middle ground.