Thursday 16 December 2010

3D Printout of Cornelius

This project is now finished as the 3D printout of Cornelius has just come through and here is the outcome.  Click on an image to enlarge.


It probably doesn't look like it in these photos but this model is pretty tiny and very delicate.  In the end, he had to be printed out without the glasses because that was causing problems with his geometry, so they went in and fixed a few problems before they made this printout.

Overall, it is quite a clear representation of Cornelius, his face is very visible and his pose came out quite smoothly.  The downside of this model are that two of his toes on his right foot broke off and the tops off two of the fingers have also broken off.  The linear detail around the waistcoat and t-shirt is not very visible, but I could perhaps paint this on.

From doing this project, I have brought many of my skills up to standard and I have improved in many areas that I struggled with last year.  Although I was initially anxious about modelling his face, I feel that I managed to shape it into a recognisable gorilla face by rotating faces and translating many of the edges.

I was already fairly good at designing textures in Photoshop; but until this project, I had no idea about UV mapping and I was therefore not very good at applying textures to models.  During this project, I got various help from fellow students and tutorials on UV Mapping and I was able to use this to texture my own character.

As for the 3D Printing, I have learnt that if I do it again, that I will make sure that think more carefully about the outcome from the beginning; especially during the modelling and posing stages.  I have learnt that I must make sure that no areas within the model are too thin as this could make it more brittle.  I have also learnt that I aim for poses where there are not too many gaps (i.e. gaps between the fingers) and that I must make most of the geometry close together.

Tuesday 14 December 2010

Turntable animation

Here is the final turntable animation that I need to submit for my assessment; here is Cornelius in his three poses, against a rainbow background.  I think he has turned out pretty well; I have got in touch with the Prototyping apartment about getting the 3d print out, so now I am waiting for that to be done.  They say it should hopefully be done by tomorrow.

Sunday 12 December 2010

Posing

I have just decided on three poses that I will present Cornelius in for the "turntable" animation; one of which I will print out in the 3D Printing stage.  I decided to focus on presenting a hippie-type character, but I still needed to emphasise the observant and laid back, middle aged character that was stated in the brief.  Here are the three poses that I decided on and I shall talk through each of them.
 This is Cornelius in the lotus pose.  This is my favorite of the three poses and is loosely based on the CG pose of Dylan that I referred to in this post, as well as various images I found of people meditating in the lotus pose across the internet.  I was originally going to do him squatting, but I decided to cross his legs in the way that many people sitting in the lotus pose do.  I think that this will be the pose that I will print out in the 3d printing stage.

 In this pose, I wanted to convey one of the key characteristics of Cornelius; he is an observer.  He is a sensible and civilised occupant in comparison to his counterparts in the London Zoo advertisement, and therefore, he provides a commentary on the people who visit the zoo each day.  I based this pose on real gorillas, in the way that they can bend over and put both their hand and feet evenly on the ground and keep their back straight.

For the third pose, I was unsure what to do with Cornelius at first; I had already done a sitting pose and a crouching pose, so I decided to present him in a standing pose.  I was initially going to do something with Cornelius putting his arms in the air and leaning back, but I decided that it would make the character look too over the top, so I decided to produce a "peace" gesture.  I used several videos and images of hippies in various poses to come up with this one; I tried to make the pose as loose as possible.

I now need to put these three models and possibly also Cornelius in the default "crucifix" pose into a turntable animation in Maya, which involves the character in each key pose rotating on the Y axis so he can be viewed at various angles.

I'm pretty excited about the next stage as this involves printing out a physical 3D model of Cornelius and it will be great to actually get to touch something that I designed and created in Maya.

Saturday 4 December 2010

Cornelius is complete!

I have just finished the texturing of Cornelius' body and now he is complete and ready for posing.  I shall begin by talking through the texturing of Cornelius' face.

His head is a separate model to the rest of his body, so I needed to texture this separately.  His face had a separate colouring to the rest of the head, so I needed to make sure this was done properly.  Initially, I was going to UV texture Cornelius' face, using planar mapping, as whatever would be drawn on one side, would appear symmetrically on the other side.  However, I found that this was too limiting and that some of the texturing of his face was coming up around the back of his head.

So, I decided to use Cylindrical Mapping.  I created a Cylindrical UV Map for the whole of the head, bar the headband and glasses.  I applied a new lambert to the head model, which I called 'gorilla_head'.  I then created a new 'PSD Network' in the UV Texture Editor, which is a Photoshop image of the UV Map, with the texture over it.  This meant that I could literally paint the texture on to the UVs in Photoshop.

I opened this new PSD in Photoshop and I got three layers;  the first was the UV Map (known as a "UV Snapshot"), the second was the lambert, which was currently a plain grey image and the third was just a  background image that is simply a default layer in newly created PSD documents.
In Photoshop, I began by colouring in around the gorilla's face and ears.  I decided that this would be a clean purple-grey colour.  I then decided that for his fur, I shall use one of the brush strokes in that actually resembles a strand of hair, and I then coloured his head in using this.  One of the key parts of Cornelius was that he is a middle-aged gorilla, so he has just begun to go grey.  I simply changed the colour of the brush stroke to a grey-white colour and then coloured around the top of the head and a bit around the face.  I then saved my file!
Back in Maya, I clicked the 'Update PSD Networks' and the changes that I had made were assigned automatically to the head geometry.  I had to manually move around a few UVs around his eye area and mouth area to get it the way I wanted.
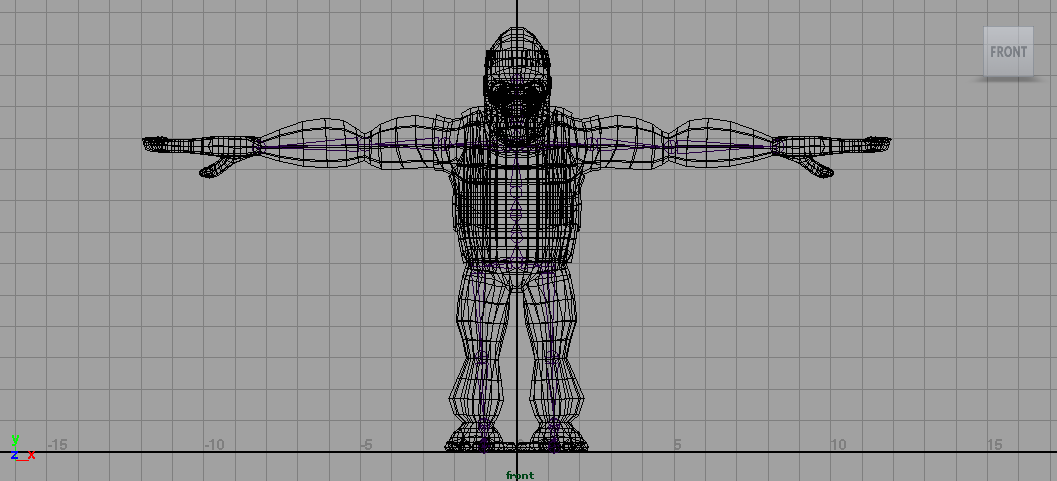
Next, I needed to do the body.  I wanted his hands and his feet to have a slightly less hairy texture than the rest of his body, as you see with many real life gorillas, so I chose to use Automatic Mapping which meant I could go into more detail with each area of the body.

There was no easy way to do this.... I had to select each area of geometry to figure out whereabouts it is in relation to the model to decide whether it should be textured with fur or should be left clear.
I created another PSD Network and for each area which was to be covered in fur, namely the legs, arms and torso, I coloured in using the hair-shaped brush tool.  Each area that was to have no fur, such as the fingers, toes and some parts of the hands and feet, I coloured in a greyish-purple with a basic brush.  I then added a little more fur to the hands and feet so the textures blended more smoothly.

This was really hard as some of the areas of geometry were really jumbled up and I had to go to a lot of trouble to find out what each part was.  In retrospect, I think it would have made more sense to colour one half of the UV map in with the basic brush tool and the other half with the fur-like brush tool; that way I could just move each part into the correct half of the map, depending on what texture I wanted it to be.
I then saved this PSD file and updated the PSD network in Maya; and all the changes I made were applied to the UV map and to Cornelius' geometry.
It took ages to texture Cornelius, but I am happy with the outcome.  I think going with a more realistic fur texture was a good choice, because it states in the brief that the character must be reflect "claymation" practices and therefore, I would need his textures to look somewhat realistic.

I now need to decide on a few poses to put Cornelius in; for the digital sequences and 3d printing.  Please feel free to leave comments on the final outcome of the Cornelius model.

Thursday 2 December 2010

Headband is textured

I have textured Cornelius' headband.  I did this by creating this texture in Photoshop.
I then created a lambert in Maya and assigned this texture.  I then applied this texture to Cornelius' headband and then fixed it with Spherical Mapping.
Here is how he looks with his headband, fully rendered.

Waistcoat

The waistcoat texture, I also created in Photoshop.  I pretty much figured this one out by myself.  I started by creating a new photoshop image and painting the entire canvas brown.  I then opened the Filter Gallery to see what filters would be appropriate for creating 
I came across one called the Texturiser, which gives it the grainy fabric effect.  I applied it to my brown surface.  The next thing to do was to apply the pocket with the rainbow pattern.  Unfortunately, I did not have the luxury of a graphics tablet, so what I did was literally go back to my cornelius head shot drawing and copy the pocket and paste it on to my brown fabric image.
I scaled the pocket up as it came out quite small on the canvas, next I opened my Cornelius model in Maya and I created another basic lambert texture.  I assigned the photoshop file to this lambert and then applied it to Cornelius' waistcoat.

For the UV mapping, I used spherical mapping, which split the UVs of the waistcoat into two halves.  The rainbow pocket appears on the Cornelius' left, so I moved that half so it was over the rainbow pocket, and then scaled it down.  The other half of the waistcoat looked uneven, so I scaled that down so all the texturing was more even.  Here is how Cornelius looks now; pretty groovy!

Cornelius' t-shirt + specs

The first stage of Cornelius' texturing was to create the texture for Cornelius' clothes.  I started with his t-shirt, which is supposed to have a tie dye effect, which is popular with the hippie culture.  I looked for various tutorials for making tie die in Photoshop, and I came across this one on deviantArt.

The tutorial stated that it was helps if the stripes are perfectly straight, but I decided for mine to make it a bit more loose.
The next step was to apply a Polar Coordinates distort, and here is how mine came out.
It still has the quite jerky but free handed effect.  I then applied the twirl and spherise effects to give it the spiralling effect.
The next stage was to create a new layer and draw in the tapering strokes.  Mine weren't as perfect in the tutorial, but then again, I used a mouse rather than a graphics tablet.  I then needed to apply a Gaussian blur and here is the outcome.
As a finishing touch for mine, I applied a peace symbol.
The next step was to apply this to Cornelius' t-shirt.  I opened the Cornelius model up in Maya and I selected his t-shirt.  In Hypershade, I created a basic lambert texture, which I assigned to the t-shirt.  I linked my newly created lambert to the tye dye image that I had just created.

At first, the image was severely stretched and distorted and nothing like what I required.  I tried playing around with various UVs from the Create UVs menu, 
I then found that when I selected the Spherical Mapping, that the image fit around the t-shirt much better and now it was just a matter of adjusting the UVs.

I am pretty much still a novice when it comes to UV mapping but I am picking things up as I go along.
I adjusted the UVs so that the peace symbol was quite firmly in the centre and so that the patter which originates on the front of the t-shirt continues on to the sleeves.

Here is how Cornelius looks with his tye dye t-shirt.  Looks a little different from the initial sketches that I did but I'm still pleased with it.
While I was at it, I did Cornelius' glasses, the lenses just have blinn textures which have been assigned ramp shaders and a little transparency.  The frame is also a blinn which just has a yellowish brown texture assigned.
I also put in a cylindrical ramp shader for the eyes, simple black and white texturing.

Tuesday 30 November 2010

Facial controls and fingers

I have set some driver keys and made some basic controls for Cornelius' face.  I did this by making a NURBS square and the some nurbs circles to act as controllers.  In the Set Driven Key window, I selected each NURBS circle and set it as a driver for a different blend shape and then I moved the NURBS circle and then keyed the blend shape poses; meaning that I could use the NURBS as controllers to change the facial expressions, rather than using the Blend Shape window.

Here is an example of how it works.  I suggest you watch in full screen!
As for the fingers, I was going to put in drivers, but I decided that for the project, it would be just as efficient to rotate and translate the joints, as I am not required to animate this character for the project.

I finished up by locking the translate, rotate and scale of my facial controller box.  As for the NURBS circles, I limited the movement, so that they could only translate on the Y axis (X axis in the case of the smile controller) and only within the controller box.

Rigging

This post is a little late but I've been busy with other stuff lately.  Here, I shall talk about the rigging of Cornelius.
I have done several character riggings over the course of my degree and I find that I have become very proficient at it.  I managed to rig Cornelius largely without any tutorials to guide me, and I applied a Smooth bind to his skin.  I had previously been used to working only with Rigid binds but I discovered that with Smooth binds, I could have more control over the influence that each joint had, avoiding any further problems.

I also put some joints in his hands and fingers, as these will be important for 2 of the poses that I am considering.
During the rigging process, I discovered a problem with Cornelius' feet, in particular his inner toes, they were joined together by the vertices!
This meant that I had to delete the some of the faces in both of the offending toes and then create polgon faces and extruding them to make new toes from scratch.  I had to make sure these toes were not close to one another.
The new toes looked far cruder than the previous but they caused less problems.  I simply went around the joints in each leg with the Paint Weights tool to control the influence that each joint has on the geometry.

I did the same in the gorilla's arms and hands.
I also discovered that when I turned Cornelius' head, the top half would move further than the bottom half, creating a distorted effect, meaning I had to increase the influence of the head and neck joints, and decrease the influence from the chest.
I then went through the back joints and increased or decreased the influence to make sure his bending down is smooth.

The next stage is to set some driver keys for his face and possibly his hands.

Sunday 28 November 2010

Blend shapes

I've just done the blend shapes for Cornelius's face;  I did this by creating various blend shapes in the Blend shapes window and adding the head as a base.
As I won't actually be animating this character, for the sake of this unit and time management, I stuck to a small set of facial expressions that I would be using for Cornelius.  I also made blend shapes for his eyelids, so he could open and shut his eyes.

Here is Cornelius with all the facial expressions that he is capable of.

In order to control Cornelius' facial expressions, I just need to control the blend shapes either with the slider in the Blend Shape window, or by creating driver keys.  Cornelius is starting to resemble the Hindu god, Brahma a bit too much, so I shall simply add all of the blend shapes to a layer which I will lock and make invisible, of course keeping the original head visible and in its own layer.

Next, I need to do Cornelius' rigging!

Saturday 27 November 2010

Finishing modelling

I have just finished the last stages of the modelling, and slightly behind schedule; although if I get blend shaping and rigging done this weekend, I'll be back on top.

I modelled one half of his glasses, with a hollow polygon cylinder and then extruded arms and a bridge from the cylinder.  The lens is simply a NURBS curve.
I then Mirrored the geometry of the gorilla's head, and then I modelled his headband, again with a hollow polygon cylinder.  I then moved the vertices so the headband fit around his head more.

Lastly I modelled his eyeballs, Polygon spheres.
Here is how Cornelius looks at present, fully modelled.


Thursday 25 November 2010

Mirroring Cornelius' body geometry

I've just mirrored Cornelius' body geometry, including his waistcoat and t-shirt, but not his head yet.  It looks pretty good so far!  Click to enlarge.
I did have to make a few amendments to his geometry, once it had been mirrored, primarily in his crotch region, which I had to delete a few edges from to make more smooth.  I also had to delete a few edges and merge a few vertices on his waistcoat, as well as move a few vertices that went into his skin geometry.

Next step is to finish modelling his glasses, along with mirroring his head geometry and I will be able to move onto the next step; blend shapes!

Ear modelling

I have modelled the gorilla's ear as, which I also did with the aid of a tutorial.  I used this tutorial on how to model a human ear: http://www.youtube.com/watch?v=QcYrUHRIqsE.  I also used a photo of a gorilla's ear that I found on the internet as reference.
A gorilla's ear is a slightly different shape to a human's ear in that the ear lobe is closer to the helix (the rim around the top of the ear), but the principle of making it from a hollow Polygon Cylinder and then extruding the inner parts was the same.
When I fully modelled the ear, I attached it to Cornelius' head, by the vertices.

Facial modelling

Here is the first of several posts that I will be posting today.  Here, I will recap on the facial modelling that I largely finished yesterday.  I modelled the face using this tutorial (http://www.youtube.com/watch?v=xls25e08sSg) as an aid, but i didn't stick to it stage by stage.

One of the errors that I came across in my character template was that the face in the front and profile was not lined up properly.
The eyes, nose and mouth in the profile image were slightly higher up than in the front image.  This meant that I had to decide on the relevant areas to have each part of the face without the adequate reference.  I was still able to use the profile reference to decide how much Cornelius' mouth should come out and the angles at which his eyes were visible from.
To produce his nose and mouth area, I was originally going to create separate polygons, but I decided that it would be easier to model them from the face that I had just produced.  I created the nose by cutting some edges around the nose area and then rotating the it out to make the round, flat shape.  I created the nostril by exturding a face and scaling inwards.
The mouth was created by pushing the edges around the area inwards, making a more distinctive shape.  and then extruding the faces outwards against the profile reference.

This is how the head looks at present.
Now all that is left is to model the ear, half of his glasses and then mirror the geometry.